This is a continuation from my previous five posts (Part Zero, Part One, Part Two, Part Three, Part Four ) about the need to have automated way of storing and pull LUKS keys for my servers.
In this post im hoping we can conclude this series with setting up a client to test this whole system. For this, i have setup a new VM and added an additonal disk to it (this is all done on a proxmox cluster).
We will go through grabbing the scripts used for this, setting it all up and then testing it. By the end of this HOPEFULLY you will have a VM you can reboot and it automatically pull its LUKS key on boot and then mount the drive for you.
Vaultlocker
The script im currently using is call Vault Locker and seems to be part of the openstack suite. Its actually quite a small python script, but does seem to work pretty well.
Installation
Installation is simple, you can install vaultlocker just by using pip.
1
pip install vaultlocker
You do then need to create the config directory and file:
1
2
mkdir /etc/vaultlocker
touch /etc/vaultlocker/vaultlocker.conf
Python versions
It looks like the devs have tried to make this compatible with both python2 and python3. I couldnt get it to work with python2 (though to be fair, i didnt really try all that hard). I just changed it to use python3 directly, within the script itself.
vaultlocker.conf
The configuration for vaultlocker is all stored in /etc/vaultlocker/vaultlocker.conf. It is a small simple config file comprising of just 3 different bits of info, here is mine with the _id’s removed:
1
2
3
4
5
[vault]
url = http://vault.xxx.host
approle = qqqqq-wwww-eeee-rrr-ttt-yyyy
secret_id = yyy-ttt-rrr-eee-wwww
backend = /vaultlocker
You can retrieve you approle ID using the following command:
1
vault read auth/approle/role/vaultlocker/role-id
Which will print out the following:
1
2
3
4
5
[jon@jons-laptop ~]$ vault read auth/approle/role/vaultlocker/role-id
Key        Value
---        -----
role_id    qqqqq-wwww-eeee-rrr-ttt-yyyy
If you have used my command to create the approle, then we dont need the secret ID.
The backend is the path we use to store our data.
Run it!
Now is the time we have all been waiting for! Lets trying this out.
First thing we need to do is get some details about the disk we are going to be encrypting. Ideally we want the UUID.
I am going to be using /dev/sdb1 for my testing, you can check in /dev/disk/by-uuid to get the UUID of your disk:
1
2
3
4
5
6
7
8
9
10
[root@test ~]# ls -lash /dev/disk/by-uuid/
total 0
0 drwxr-xr-x. 2 root root 140 Nov 10 03:53 .
0 drwxr-xr-x. 6 root root 120 Nov 10 03:53 ..
0 lrwxrwxrwx. 1 root root  10 Nov 10 03:53 09a0896e-6e60-47d8-a51c-a538b94db494 -> ../../sda1
0 lrwxrwxrwx. 1 root root   9 Nov 10 03:53 2019-09-11-18-50-31-00 -> ../../sr0
0 lrwxrwxrwx. 1 root root  10 Nov 10 03:53 65242782-090c-44ab-8808-289b5903a6a6 -> ../../sdb1
0 lrwxrwxrwx. 1 root root  10 Nov 10 03:53 e45b5102-c583-4b96-805b-b52a4c440ce4 -> ../../dm-0
0 lrwxrwxrwx. 1 root root  10 Nov 10 03:53 ef376ffc-983c-4cab-859a-2b8d6ba5faf5 -> ../../dm-1
Now i know my UUID, lets try and encrypt it and see if it sends the LUKS key to Vault! Run the following, though use your own UUID and block device:
1
[root@test ~]#  vaultlocker encrypt --uuid 65242782-090c-44ab-8808-289b5903a6a6 /dev/sdb1
You SHOULD then get an output similar to this:
1
2
3
4
5
6
7
8
9
10
11
12
13
14
15
16
17
18
19
20
DEBUG:urllib3.connectionpool:Starting new HTTP connection (1): vault.haynet.host:80

DEBUG:urllib3.connectionpool:http://vault.haynet.host:80 "POST /v1/auth/approle/login HTTP/1.1" 200 487

INFO:vaultlocker.dmcrypt:LUKS formatting /dev/sdb1 using UUID:65242782-090c-44ab-8808-289b5903a6a6

INFO:vaultlocker.dmcrypt:udevadm trigger block/add for /dev/sdb1

INFO:vaultlocker.dmcrypt:udevadm settle /dev/disk/by-uuid/65242782-090c-44ab-8808-289b5903a6a6

DEBUG:urllib3.connectionpool:http://vault.haynet.host:80 "POST /v1/vaultlocker/test.haynet.host/65242782-090c-44ab-8808-289b5903a6a6 HTTP/1.1" 204 0

DEBUG:urllib3.connectionpool:http://vault.haynet.host:80 "GET /v1/vaultlocker/test.haynet.host/65242782-090c-44ab-8808-289b5903a6a6 HTTP/1.1" 200 864

INFO:vaultlocker.dmcrypt:LUKS opening 65242782-090c-44ab-8808-289b5903a6a6

INFO:root:Enabling systemd unit for vaultlocker-decrypt@65242782-090c-44ab-8808-289b5903a6a6.service

Created symlink from /etc/systemd/system/multi-user.target.wants/vaultlocker-decrypt@65242782-090c-44ab-8808-289b5903a6a6.service to /usr/local/lib/systemd/system/vaultlocker-decrypt@.service.
[root@test ~]#
I have added linebreaks to make it a little more readable. But in short, it worked perfectly!
It tested it can access my vault cluster, it formatted the disk, it encrypted it, it then read the hostname of the machine and created a new secret in /vaultlocker backend and put the LUKS key there under the UUID of the disk.
If we check the UI now we should see it there:
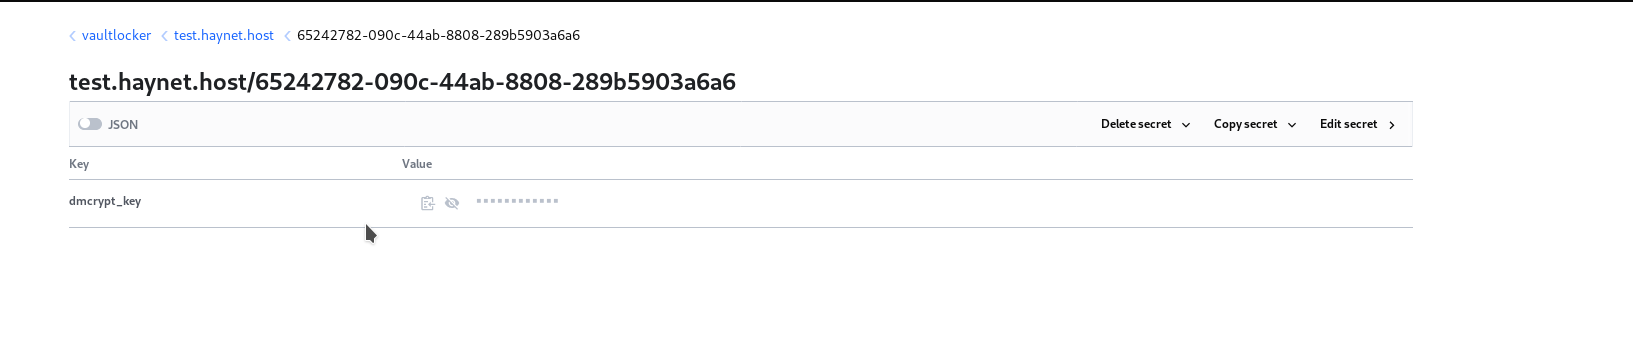 LUKS key in the vault UI. Yup, its there! That is AWESOME!
Now onto the final bit…mounting at boot.
Setting up the service file
You will notice that vaultlocker created a systemd service file for us. As it stands, this service file will decrypt the device on boot. But i want it to mount on boot as well. due to timings and possibly my mistakes, i couldnt get this to work with fstab or crypttab. So i add it onto the command inthe service file. Here is my service file:
1
2
3
4
5
6
7
8
9
10
11
12
13
14
[Unit]
Description=vaultlocker retrieve: %i
DefaultDependencies=no
After=networking.service

[Service]
Type=oneshot
KillMode=none
Environment=VAULTLOCKER_TIMEOUT=10000
ExecStart=/bin/sh -c 'vaultlocker --retry $VAULTLOCKER_TIMEOUT decrypt %i && /usr/bin/mount -t ext4 /dev/mapper/crypt-65242782-090c-44ab-8808-289b5903a6a6 /test'
TimeoutSec=0

[Install]
WantedBy=multi-user.target
I have just added the mount command after its decrypted. This just mounts to /test.
I will be posting a final thought post to conclude this series hopefully tomorrow….no, in a few hours as its now 4am.